📊 Comprehensive Binance Futures Trading Guide
Complete guide for Binance Futures Trading - From beginner to advanced
There is a lot to learn ahead of anyone interested in futures trading. Before you get started, you need to hone your technical skills and learn basic trading concepts.
The Binance Futures UI may seem intimidating at first glance, but with our guide below you will quickly become familiar with the key features and aspects of futures trading.
Traditional futures contracts are derivatives that obligate investors to buy or sell an asset in the future. Unlike traditional futures contracts, perpetual futures contracts do not have a settlement date.
Before opening a Binance Futures account, you must open a standard Binance account. If you don't have an account yet, you can go to Binance and click the Sign Up button in the upper right corner of the screen.
-
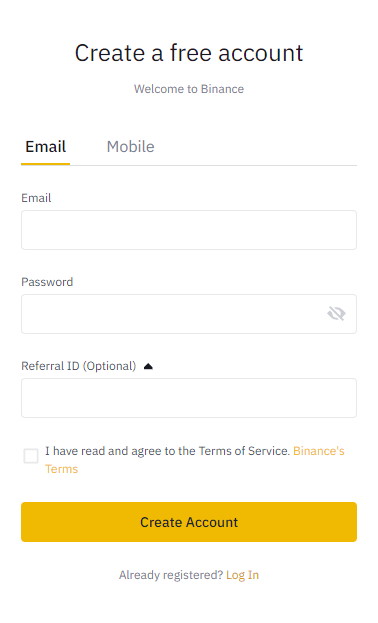
Create Account
Enter your email address and a strong password. If you have a reference ID, paste it into the reference ID box. Click [Create Account] to continue. -
Email Verification
You will receive a verification email shortly. Follow the instructions in the email to complete your registration. -
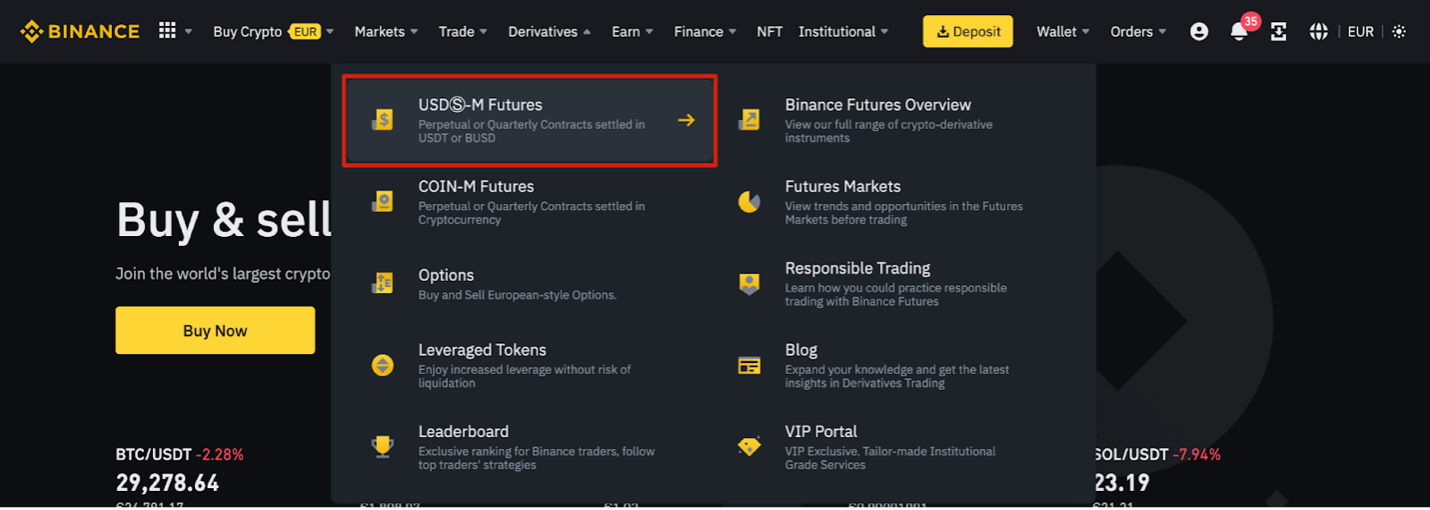
Access Derivatives Section
Log in to your Binance account, hover your cursor over the [Derivatives] section in the bar at the top of the page, and click USD(S)-M Futures. -
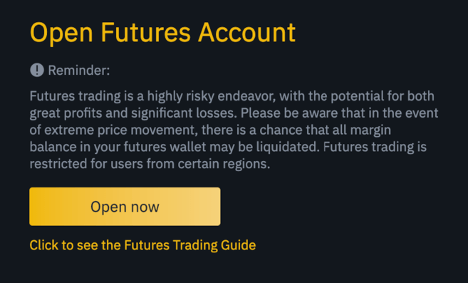
Account Activation
Click [Open now] to activate your Binance Futures account. You can now buy and sell futures products on Binance.
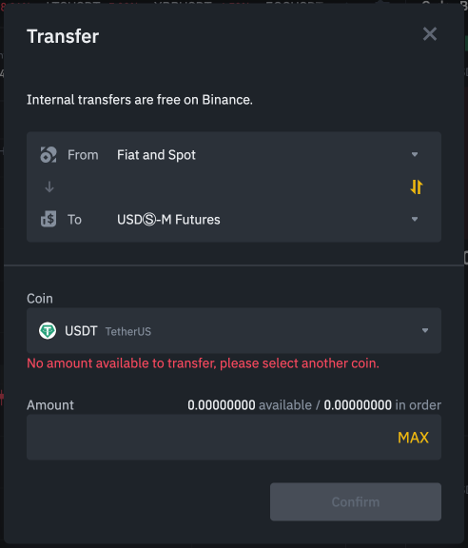
To deposit funds into your Futures account, you must first make sure that you have funds in your Binance account to transfer.
Fund Sources
Funding Wallet
Your main fund source
Fiat Wallet
Fiat currency
Spot Wallet
From spot trading
Margin Wallet
From margin trading
Options Wallet
From options trading
Transfer Process
-
Click Transfer Icon
To transfer funds to your Futures Wallet, click the transfer icon on the right side of the Binance Futures page. -
Amount and Source Selection
After determining the amount you want to transfer and the wallet you want to use, click [Confirm]. -
Transfer Completion
The balance will be credited to your Futures wallet shortly. You can also change the direction of the transfer if you wish.
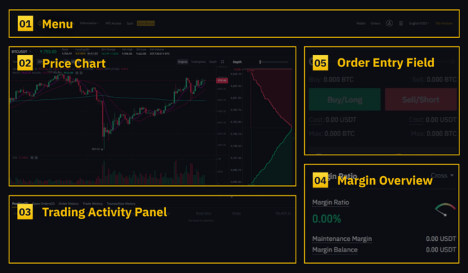
The Binance Futures interface consists of 5 main sections. Understanding the function of each section is critical for effective trading.
1. Menu Section
In the [Menu] section you can see links to other Binance pages such as COIN-M Futures, Options, Trading Bots and Transactions. Under the [Information] tab you can find links to the Futures FAQ, API Access, funding rate, index price and other market data.
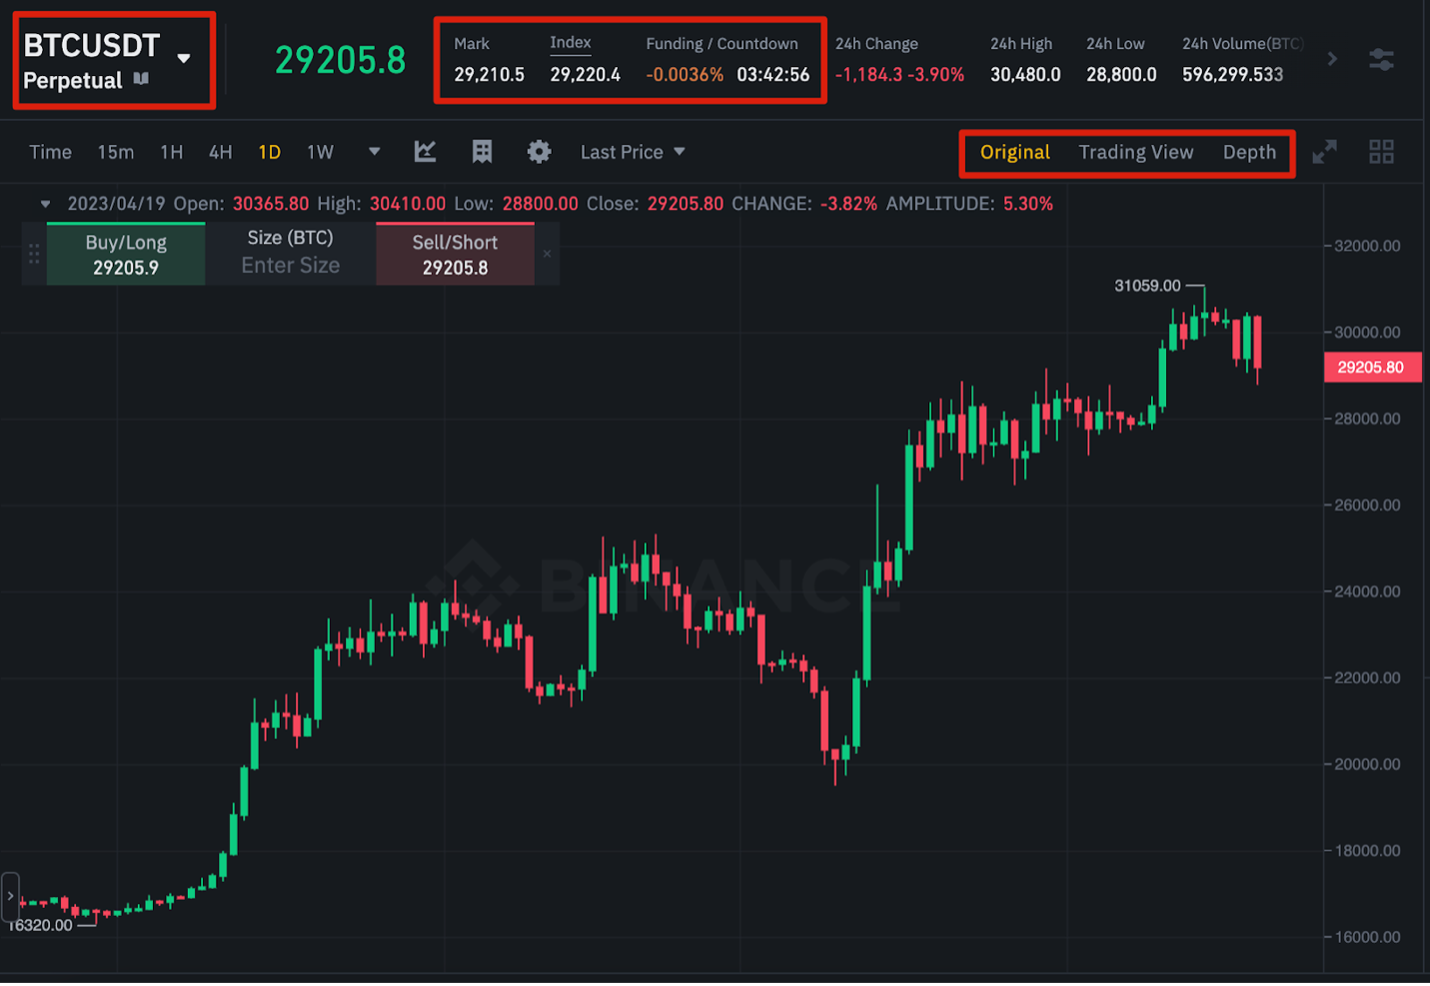
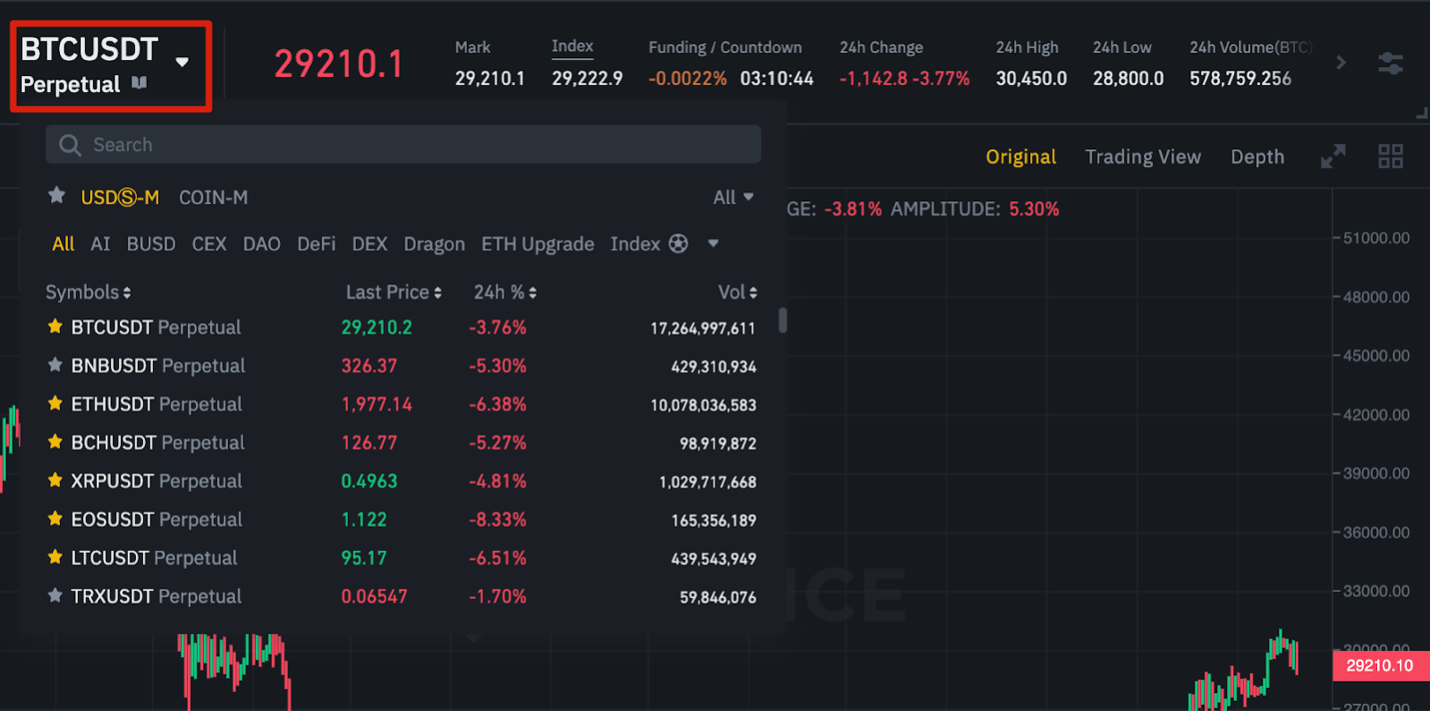
2. Price Chart Section
In the [Price Chart] section you can:
- Select a contract by hovering your cursor over the current contract name (BTCUSDT by default)
- Check Mark Price - It is especially important that you pay attention to this as liquidations are made based on the Mark Price
- Check the expected funding rate and the time until the next funding round
- Perform technical analysis with TradingView integrated chart
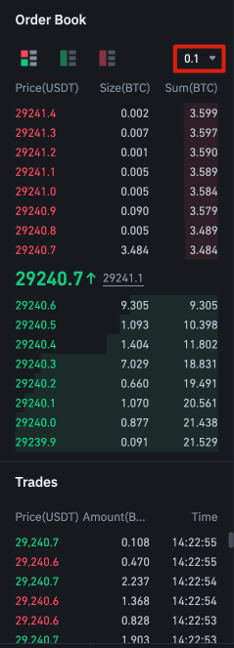
- View the current order book depth in real time by clicking the [Depth] button
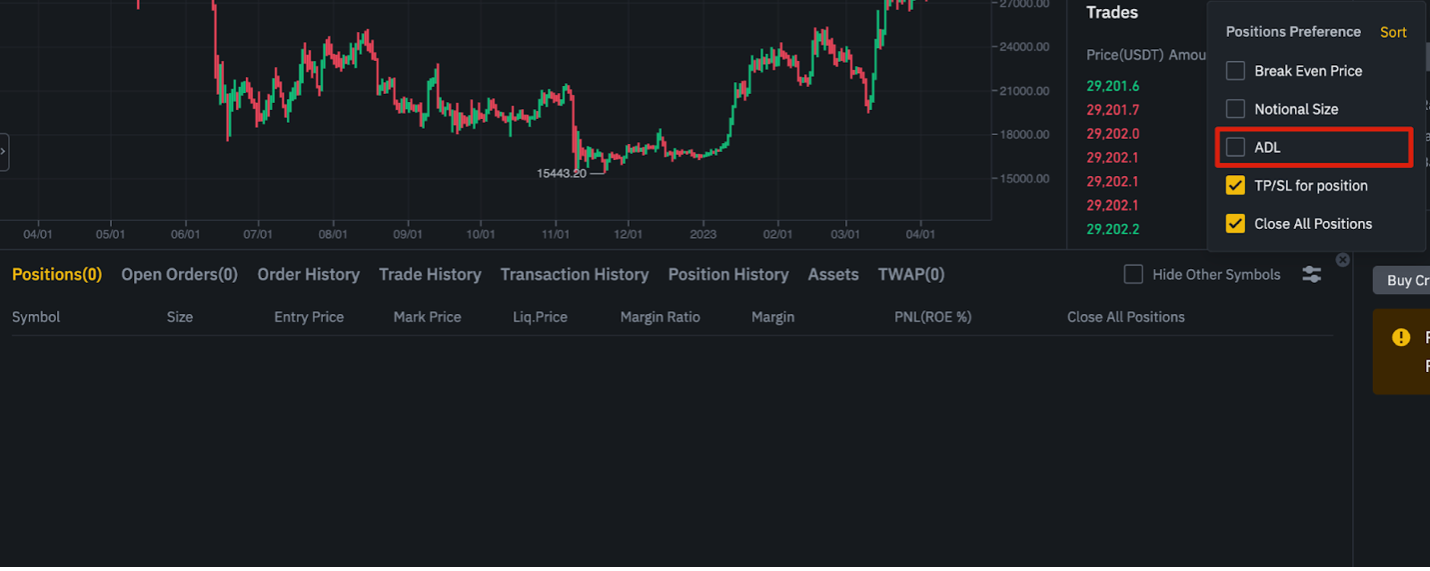
3. Trading Activities Panel
[Trading Activities Panel] allows you to monitor your futures trading activities:
- Current status of your positions
- Currently open orders
- Previously executed orders
- Trading history for specific time periods
- Your ADL (Auto-Deleveraging) ranking
4. Margin Overview
In the [Margin Overview] section, you can:
- Check your existing assets
- Make transfer transactions
- Buy more crypto
- View current contract and position information
- Monitor margin ratio (critical to prevent liquidations)
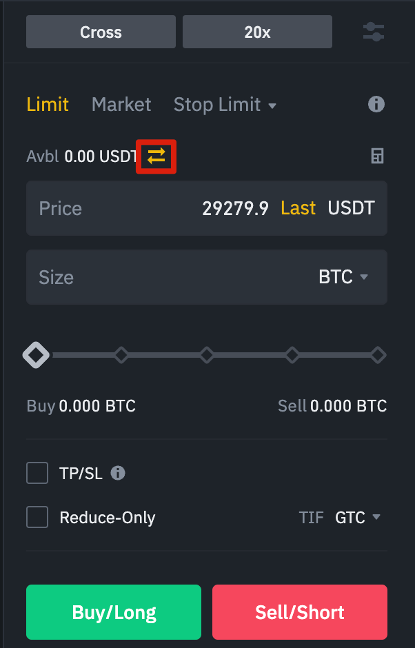
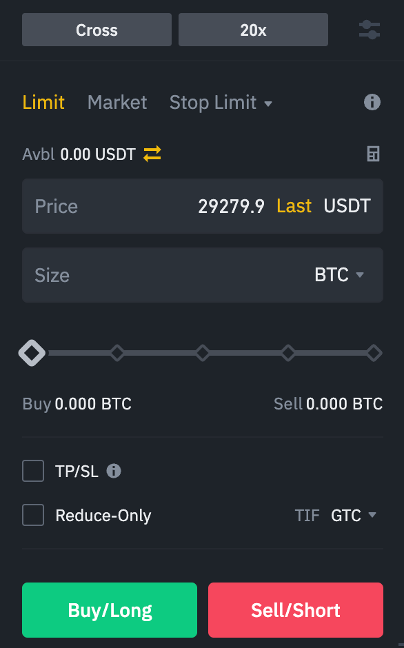
5. Order Entry Area
The [Order Entry] field is where you will enter your Buy/Long and Sell/Short orders. In this section you can:
- Switch between Cross Margin and Isolated Margin
- Adjust your leverage level (20x by default)
- Select different order types
- Determine your position size


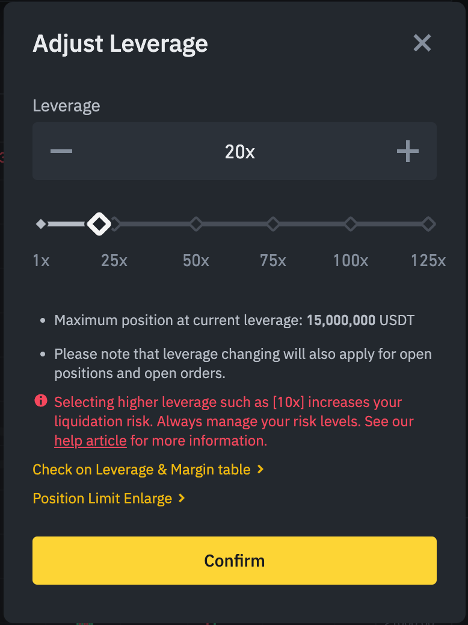
Binance Futures allows manual adjustment of leverage for all contracts.
Leverage Adjustment Steps
-
Contract Selection
To select a specific contract, hover your cursor over the current contract (BTCUSDT by default) at the top left of the page. -
Access Leverage Menu
Go to [Order Entry] and click on your current leverage (20x by default). -
Set Leverage
You can specify the leverage ratio by moving the slider bar to the desired level or by clicking the [Confirm] button after typing the ratio.
• The larger the position, the lower the leverage you can use
• Similarly, the smaller the position, the higher the leverage you can use
• Using higher leverage involves higher risk of liquidation
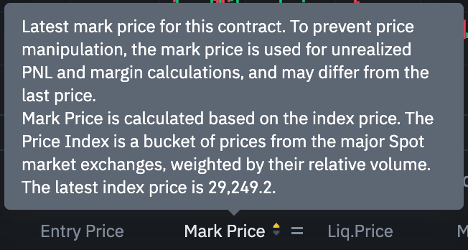
Binance Futures uses a last price and a mark price to avoid sudden price changes and unnecessary liquidations during times of high volatility.
Last Price
Usage: Used to calculate your Realized PnL (Profit and Loss).
Mark Price
Usage: Used to calculate your liquidation price and unrealized PnL.
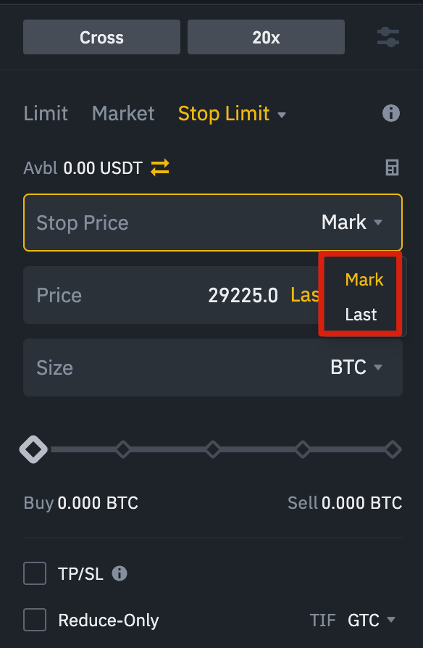
Stop Price Triggers
When placing an order type that uses the stop price as the trigger, you can choose the last price or the mark price as the trigger. To do this, you can select the price you want to use from the [Trigger] drop-down menu at the bottom of the order entry area.
When placing your orders, you can choose from different order type options. Each order type has its own advantages and usage scenarios.
Basic Order Types
🎯 Limit Order
Advantage: Provides price control, you can receive market maker commission.
Usage: To buy at a lower price or sell at a higher price than the current market price.
⚡ Market Order
Advantage: Executes immediately.
Disadvantage: You pay market taker commission, risk of slippage.
Advanced Order Types
🛑 Stop-Limit Order
The easiest way to understand a stop-limit order is to separate it into stop price and limit price:
- Stop Price: The price that triggers the limit order
- Limit Price: The limit price of the triggered limit order
🚀 Stop Market Order
Similar to a stop-limit order, it uses the stop price as the trigger, but when the stop price is reached, it triggers a market order instead of a limit order.
💰 Take-Profit Limit Order
Advantage: Ideal for securing profits at certain price levels.
Note: These are not OCO (One-Cancels-Other) orders.
🎪 Trailing Stop Order
Helps you secure your profits while limiting potential losses on your open positions:
- Long Position: If price moves up, the trailing stop loss will move up with the price
- Short Position: If price moves down, the trailing stop will move down with the market
- Callback Rate: Determines the percentage difference by which the trailing stop loss price will "follow" the last transaction price
TIF (Time in Force) Instructions
GTC
Good Till Cancelled
IOC
Immediate or Cancel
FOK
Fill or Kill
Special Instructions
- Post Only: Your order will always be added to the order book first, you receive market maker commission
- Reduce Only: New orders will only reduce existing open positions, never increase them

You can find the calculator above the order entry area. This calculator allows you to calculate values before entering a long or short position.
Calculator Tabs
📊 PNL Tab
• Initial Margin
• Profit and Loss (PnL)
• Net Worth/Rate of Return (ROE)
Required Information: Planned entry and exit price, position size
🎯 Target Price Tab
At what price you need to exit the position to reach the target rate of return
Usage: Ideal for planning your profit-taking strategy
⚠️ Liquidation Price Tab
Your estimated liquidation price
Required Information: Your wallet balance, targeted entry price, position size
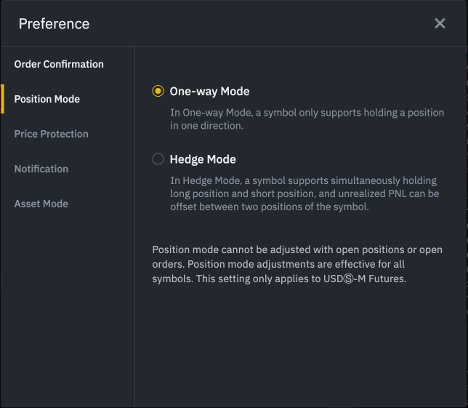
In hedge mode, you can hold both long and short positions in the same contract simultaneously.
When to Use Hedge Mode?
Advantage: In hedge mode, your quick short positions do not affect your long positions.
Default: One-Way Mode
The default position mode is One-Way mode. This means that you cannot open both long and short positions in a contract at the same time. If you try to do this, the positions will cancel each other out.
Hedge Mode Activation
-
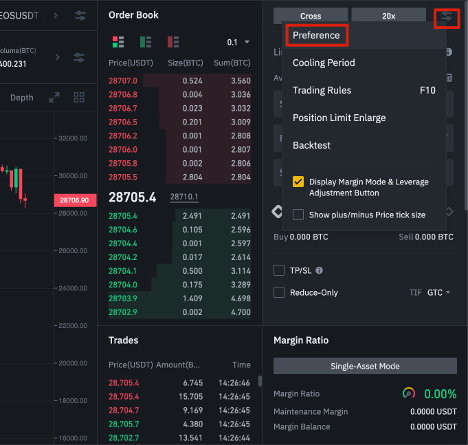
Preferences Menu
Go to the top right of your screen and select [Preference]. -
Position Mode Change
Go to the [Position Mode] tab and select [Hedge Mode].
The funding rate ensures that the price of a perpetual futures contract remains as close as possible to the (spot) price of the underlying asset.
How Funding Rate Works
Payment Direction: The difference between the perpetual futures price and the spot price determines which party receives the payment.
Funding Rate Scenarios
Positive Funding
📈 Long position → Pays short position
Negative Funding
📉 Short position → Pays long position
Funding Payments on Binance
- Frequency: Every 8 hours
- Tracking: At the top of the page, next to the mark price
- History: From [Information] → [Funding Rate History] menu
Liquidation occurs when your margin balance falls below the required maintenance margin. This is a critical risk management topic.
Liquidation Process
• Margin balance < Maintenance margin
• Margin ratio reaches 100%
• Unrealized losses consume margin
Margin Types
Cross Margin
Entire balance is shared among all positions
Isolated Margin
Balance can be allocated to a single position
Maintenance Margin
Variability: May vary depending on the size of your positions
Rule: Larger positions = Higher maintenance margin required
Liquidation Prevention Strategies
- Monitor Margin Ratio: Check continuously from the lower right corner
- Use Stop-Loss: Instead of waiting for automatic liquidation
- Low Leverage: Choose leverage appropriate to your risk tolerance
- Position Size: Risk a small portion of your balance
Auto-Deleveraging (ADL)
In cases where market conditions are exceptionally volatile, the Insurance Fund may not be able to cover losses. In such cases, position reductions are made in a sequence:
1. Investors with the highest profits
2. Investors using the highest leverage
Tracking: You can see your place in the queue by hovering over [ADL] under [Positions tab].

Important Risk Warnings
• Digital asset prices may fluctuate
• The value of your investment may decrease or increase
• You may not get back the amount you invested
• Past performance is not a reliable indicator of future performance
• High market risk and price volatility
• In case of negative price movements, your entire margin balance may be liquidated
• Funding costs can affect long-term positions
• Leverage amplifies both profits and losses
Responsible Trading Principles
- Education: Before trading, make an independent assessment of the suitability of your transactions in light of your own objectives and circumstances
- Advisory: Seek advice from your own advisors where appropriate
- Risk Tolerance: Trade only with amounts you can afford to lose
- Diversification: Don't invest all your capital in a single asset
- Continuous Learning: Continuously learn market conditions and strategies
Test Environment Recommendation
You can take advantage of the Binance Futures testnet to test the platform without risking real funds. This is an ideal learning environment, especially for beginners.
Legal Disclaimers
Cryptocurrency derivative products may be restricted in certain jurisdictions or regions or to certain users pursuant to the requirements of applicable laws and regulations. It is your responsibility to check local regulations regarding access to products and services offered by Binance.